To winterize a motorhome, drain its tanks and water system, then protect the plumbing with RV antifreeze, compressed air, or both, following your manufacturer’s instructions. Prepare the rest of the motorhome for storage before freezing weather arrives. Plumbing layouts, water heaters, and appliances vary, so use this checklist alongside your RV and appliance manuals.
TL;DR
- Drain the holding tanks, freshwater tank, and water lines before freezing conditions arrive. Follow your water heater’s specific draining and winterization procedure.
- Choose RV antifreeze, compressed air, or a combination based on your manufacturer’s instructions. Use only antifreeze approved for RV drinking-water systems.
- Check overlooked fixtures, drains, and water-fed appliances, then complete storage preparation for the motorhome’s batteries, engine, generator, tires, and interior.
Motorhome Winterization Checklist at a Glance
Complete these steps before freezing conditions reach your stored motorhome. Follow your RV and appliance manuals for valve positions, equipment limits, and model-specific procedures.
- Shut down the water system. Disconnect city water, switch off the pump and all water-heater power sources, and let the heater cool.
- Empty the holding tanks. Drain the black and gray tanks at an approved dump station, flushing as directed.
- Drain the freshwater system. Empty the freshwater tank and open low-point drains and faucets according to your manual.
- Winterize the water heater. Relieve pressure before opening drains, then follow its specific draining and bypass instructions.
- Remove or bypass water filters. Drain filter housings and handle cartridges according to the filter manufacturer’s instructions.
- Protect the water supply lines. Set valves and drains for your chosen method, then use approved RV antifreeze, regulated compressed air, or both.
- Work through every fixture. Treat hot and cold lines separately, including kitchen and bathroom faucets, showers, exterior fixtures, and toilet supplies.
- Check additional plumbing. Winterize the city-water inlet, tank-flush system, ice maker, washer, and other water-fed equipment using their specific procedures.
- Protect drains and toilets. Add RV antifreeze to P-traps and winterize toilets as directed; treating drains alone does not protect supply lines.
- Finish storage preparation. Turn off the pump and follow storage instructions for batteries, engine, generator, fuel, tires, exterior, and interior.
What You’ll Need to Winterize Your Motorhome
Gather your supplies before draining the system. Check whether your motorhome already has a water-heater bypass and antifreeze siphon connection before buying additional equipment.
- Owner’s and appliance manuals: Keep the winterization instructions and valve-location diagrams within reach.
- Non-toxic RV/marine antifreeze: Choose a product labeled for potable, or drinking-water, systems. You may still need it for drain traps when using compressed air.
- Basic hand tools: Bring screwdrivers and wrenches suited to your access panels and plumbing fittings.
- Water-heater drain tool: Have the correct socket or wrench for the drain plug or anode rod, if your heater uses one.
- Water-pump winterizing or siphon kit: If required, use a compatible kit that lets the pump draw antifreeze from its container.
- Bucket and rags: Keep these nearby to catch drainage and clean up spills.
If you’re using compressed air
You’ll also need equipment that connects to your RV’s plumbing and controls the incoming air:
- Blowout adapter: A fitting that connects the compressor hose to the RV’s designated winterization connection, commonly the city-water inlet.
- Air compressor: Choose one with enough airflow to purge the lines, using clean hoses and suitable filtration to avoid introducing oil or debris.
- Air-pressure regulator and gauge: Use these to set and monitor pressure before air enters the plumbing.
Follow the winterization pressure specified by your RV and plumbing-system manufacturers. There is no single pressure setting suitable for every motorhome.
If you’re using RV antifreeze
Look for antifreeze specifically labeled for winterizing RV or marine drinking-water systems and compatible with your equipment. “Non-toxic” does not mean drinkable; the system still needs flushing before it returns to use. Never use automotive antifreeze in your RV’s water system.
Check your manual for the quantity needed and choose a protection rating suited to your storage conditions. Follow the product’s mixing instructions; ready-to-use antifreeze should not be diluted.
How to Winterize a Motorhome Step by Step
Watch the video below, then follow the written steps to work through your motorhome’s water system. Keep your RV and appliance manuals handy for the winterization method and valve settings that apply to your setup.
The steps below cover the main sequence, but valve settings and appliance procedures vary.
- Park safely and shut down the water system
- Empty and flush the black and gray tanks
- Drain the freshwater tank and low-point drains
- Drain and bypass the water heater
- Remove or bypass water filters
- Blow out the water lines, if you’re using compressed air
- Pump RV antifreeze through the plumbing
- Run every hot and cold fixture
- Protect the toilet and P-traps
- Winterize easy-to-miss water lines and appliances
Start by parking safely and shutting down the water system, then work through draining, protecting the plumbing, and checking each fixture and appliance.
1. Park safely and shut down the water system
Park on firm, level ground, secure the motorhome, and leave yourself room to reach the service compartments. A level position helps water drain from the plumbing.
Disconnect the incoming water supply and switch off the water pump. Turn off every water-heater heating source, including electric and propane operation, and allow the water to cool completely before draining. Keep the heater off throughout winterization.
2. Empty and flush the black and gray tanks
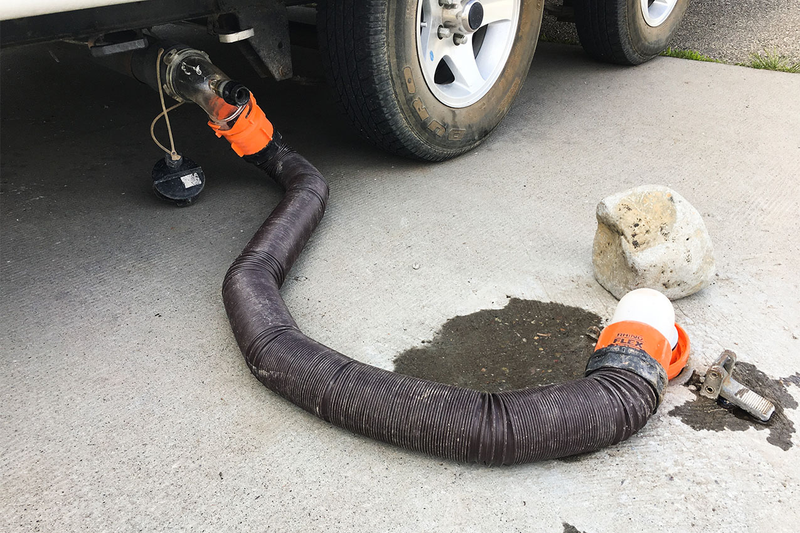
Use an approved RV dump station or a campsite sewer connection that permits tank dumping. Empty the black tank first, rinse it according to your RV’s instructions, then empty the gray tank to help rinse the sewer hose. Follow the manual for any additional tank-cleaning steps.
If you use a built-in black-tank flush, keep the black-tank drain valve open while flushing. Drain and store your sewer equipment afterward.
Before you begin, find an RV dump station near your route on Campendium and confirm its hours and seasonal availability.
3. Drain the freshwater tank and low-point drains
Locate the freshwater tank drain and the hot- and cold-water low-point drains using your plumbing diagram. These drains release water from the tank and the lower sections of the supply lines.
Open the faucets as directed to help water drain. Emptying the freshwater tank alone does not clear the rest of the plumbing. Follow the manual’s separate instructions for draining the pump, strainer, and suction line. Close drains when required for the next stage, particularly before pumping antifreeze.
4. Drain and bypass the water heater
For a conventional tank-style heater, confirm that the water is cool and all heating sources are off. Relieve pressure according to the heater manual before removing its drain plug or anode rod.
Let the tank drain, then set its bypass valves as instructed before pumping antifreeze. The bypass routes antifreeze into the hot-water plumbing without filling the heater tank. Never energize an empty water heater.
Tankless and hydronic heaters need their own instructions. Truma AquaGo uses a specific draining and bypass procedure. Aqua-Hot requires RV antifreeze through its domestic-water coil and warns that compressed air cannot winterize that coil. Do not automatically apply the tank-style procedure to either system.
5. Remove or bypass water filters
With the water supply off and pressure released, remove filter cartridges or install the specified bypass fitting before introducing antifreeze. Drain filter housings and follow the filter manufacturer’s storage instructions.
Check every filter location, including whole-coach filtration, under-sink drinking-water filters, and refrigerator filters. Removing a cartridge does not, by itself, drain or protect its housing and connecting lines.
6. Blow out the water lines, if you’re using compressed air
Use this method only where your RV and appliance manufacturers permit it. After draining, configure the valves and drains for the prescribed blowout procedure.
Connect a blowout adapter to the designated inlet, commonly the city-water connection. Use clean air, suitable filtration, and a regulator set to your system’s specified winterization pressure. Do not copy a pressure setting from another RV.
Open the fixtures required by your manual and apply regulated air, working through every hot and cold branch listed in Step 8. Follow the specified purge sequence until water stops emerging. Shut off the air supply and release pressure before disconnecting equipment. Check the pump and any plumbing branches that require separate treatment.
7. Pump RV antifreeze through the plumbing
Skip this step only if your manufacturer approves winterizing the relevant supply lines without antifreeze.
Confirm that filters, the water heater, and drain valves are configured for antifreeze winterization. Connect the siphon hose or designated winterization inlet and set the valves so the onboard pump draws from the antifreeze container. Use only antifreeze approved for RV drinking-water systems.
Keep the hose submerged, switch on the pump, and begin opening fixtures as described below. Watch the container and replace it before it empties. The same basic pump-and-siphon process applies to many travel trailers, although connections and valve positions differ.
8. Run every hot and cold fixture
Work through the motorhome in a consistent order so you can check off each fixture:
- Kitchen faucet, including any separate drinking-water faucet.
- Bathroom faucets in every bathroom.
- Indoor shower and handheld sprayer.
- Outdoor shower, spray port, and exterior kitchen faucet.
- Every toilet’s water supply and any attached hand sprayer.
Treat hot and cold lines separately. With antifreeze, run each branch until a steady flow of the winterizing solution replaces the water, following the product and RV instructions. With compressed air, complete the prescribed purge for each branch. A treated kitchen faucet does not confirm that the bathroom or outdoor shower is protected.
9. Protect the toilet and P-traps
P-traps are the curved drain sections that hold water to block odors. Add the specified amount of RV antifreeze to each sink and shower trap, including when you use compressed air for the supply lines.
Follow the toilet manufacturer’s procedure for its water valve, supply line, bowl, and seal. Pouring antifreeze into the bowl alone does not treat its incoming water supply.
Antifreeze poured down drains does not winterize the entire water system. It protects the drain side; supply lines, pumps, and fixtures need their own treatment.
10. Winterize easy-to-miss water lines and appliances
Before finishing, check your equipment list against the motorhome’s plumbing diagram. These components may need separate valve settings, draining, or appliance cycles:
- City-water inlet and check valve: Follow the inlet-specific procedure, including any connected hose reel.
- Outdoor fixtures: Recheck showers, spray ports, exterior sinks, and detachable hoses.
- Refrigerator and ice maker: Include the water dispenser, supply tubing, and appliance valves.
- Washer and dishwasher: Follow their winterization instructions for supply lines, internal plumbing, and drain pumps.
- Drinking-water filtration: Check housings, dedicated faucets, and connecting lines.
- Black-tank flush: Winterize this separate circuit even after emptying and rinsing the tank.
- Shower recirculation systems: Follow the manufacturer’s valve sequence for return lines.
- Other water-fed equipment: Include any additional pump, accumulator, macerator, or appliance identified in your manuals.
Once all fixtures and appliances are treated, switch off the water pump and leave faucets, drains, and valves in their specified storage positions. Record what you changed so you can restore the system correctly when dewinterizing.
RV Antifreeze vs. Compressed Air: Which Winterization Method Should You Use?
The right method depends on your motorhome’s plumbing, water heater, and installed appliances. Compare the tradeoffs below, then follow the procedure specified for your setup.
| Method | How it works | Advantages | Watch-outs |
|---|---|---|---|
| RV antifreeze | Replaces remaining water in drained supply lines with antifreeze approved for RV drinking-water systems. | Can use the onboard pump and siphon connection; no compressor needed when this method is approved. | Requires correct heater and filter settings, treatment of every branch, and flushing before reuse. |
| Compressed air | Pushes water out of drained lines through open fixtures using regulated air. | Reduces antifreeze use in supply lines and the amount to flush out later. | Pressure must follow system specifications. Pumps, appliances, and separate plumbing branches may need additional treatment. |
| Both | Blows out the lines, then pumps RV antifreeze through the required plumbing. | Removes more water before introducing antifreeze, helping limit dilution from residual water. | Requires both sets of equipment and additional steps. Heater and appliance instructions still apply. |
Using compressed air does not necessarily mean eliminating antifreeze. Drain P-traps still need protection, and some equipment requires antifreeze through its internal plumbing.
Check the separate instructions for your installed appliances, too. Your motorhome manufacturer’s procedure should take precedence.
Common RV Winterization Mistakes
Before storing your motorhome, check for these oversights that can leave plumbing or other equipment unprotected.
- Forgetting the required water-heater bypass. For conventional tank-style heaters, the bypass keeps antifreeze from filling the drained tank. Tankless and hydronic systems may require a different procedure, so check your heater’s instructions.
- Using the wrong antifreeze. Use a product approved for winterizing RV drinking-water systems. Automotive coolant and windshield-washer fluid do not belong in your freshwater plumbing.
- Missing an outdoor fixture or appliance. Check outdoor showers, spray ports, exterior kitchens, ice makers, washers, and dishwashers. Antifreeze reaching one faucet does not confirm that every branch is protected.
- Overlooking the city-water inlet. Include the inlet, check valve, and any connected hose reel in your checklist. Follow their winterization instructions rather than assuming the indoor faucet procedure covers them.
- Applying excessive compressed-air pressure. Set and monitor pressure with an air regulator and gauge. Exceeding your system’s specified winterization limit can damage plumbing components.
- Copying another RV’s procedure exactly. Valve layouts, pumps, heaters, and appliances differ. Use demonstrations to understand the process, then confirm the connections and settings for your particular motorhome.
- Winterizing only the drains. Antifreeze poured into P-traps protects the drain side. Supply lines, the pump, toilet valves, and water-fed appliances still need treatment.
- Stopping after the plumbing. Complete storage preparation for both house and chassis batteries, the engine, fuel system, and generator. Charging, disconnection, and maintenance requirements depend on the installed equipment.
What Happens in Spring?
Before using your motorhome’s water system again, you’ll need to dewinterize it. Flush out any antifreeze, sanitize as directed, inspect for leaks, and return valves, filters, and appliances to their normal operating setup. Follow your RV and appliance manuals, and check that everything works before your first trip.
Frequently Asked Questions
Some RVs need about 2–3 gallons, while more complex systems may require more. The amount depends on plumbing length, water-heater bypass configuration, and appliances such as washers or ice makers. Check your manual’s quantity recommendation, and continue until every required fixture and component has been treated.
Follow the faucet positions specified in your RV’s winterization instructions. Opening faucets during draining and line treatment is different from leaving them open throughout storage. The final position depends on your system and method; leaving faucets open does not replace draining and protecting the plumbing.
No. Antifreeze poured down a sink or shower drain protects the P-trap, which holds water to block odors. It does not reach the freshwater supply lines, pump, or faucet valves. Those components must be drained and winterized separately using the procedure approved for your RV.
Winterize before your stored RV is exposed to freezing conditions, generally 32°F (0°C) or below. Plan around the forecast and conditions at your storage location rather than a calendar date. Follow your manufacturer’s guidance, and account for overnight lows even when daytime temperatures remain above freezing.
Yes, if your RV and appliance manufacturers approve that method. Some procedures use regulated compressed air; others require RV antifreeze or both. Drain traps and certain appliances may still need antifreeze. Review the comparison above and follow your system’s pressure limits and component-specific instructions.
The plumbing principles are similar, but a motorhome also needs storage preparation for its engine, drivetrain, chassis, and starting battery. Both types may have house batteries, generators, and additional water-fed appliances. Build your checklist around the equipment installed, including the separate engine and generator manuals.
Plan Your Next RV Trip With Campendium
With your motorhome prepared for storage, start planning your first spring trip on Campendium. Compare campgrounds, check recent reviews and RV amenities, and save a few backup stops. Find dump stations along your route so you know where to empty your tanks when you’re back on the road.